In this post I’ll walk through a CrackMe designed for beginners, showing how to reverse it and create a simple keygen.
I will only be doing static analysis for this crackme as its a basic one and does not require dynamic analysis. Link to the crackme if you want to try it yourself: https://crackmes.one/crackme/60d65d0833c5d410b8843014
Note: I won’t be providing tutorials on how to use the tools mentioned here, since you can easily find plenty of detailed guides online that explain them much better
Initial Run
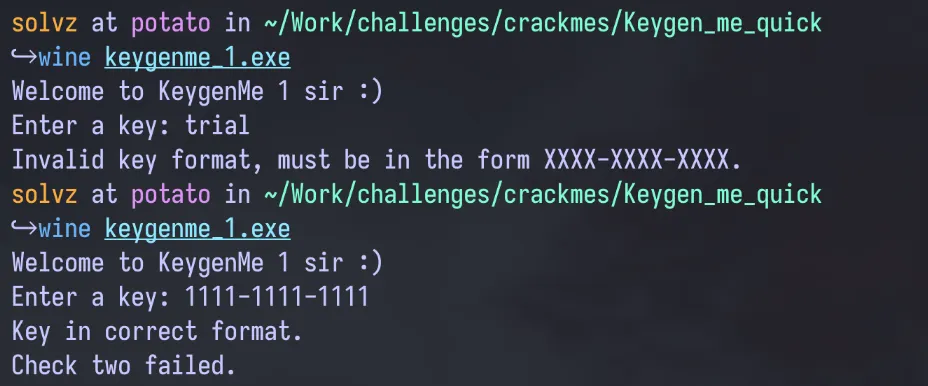
The file is a PE File (PE or Portable Executable is a Windows Executable File), so I used WINE to run the file on Fedora (my preferred OS). Before analyzing the binary, i wanted to run and check how the binary runs to the user. On the first run I was asked to enter a key, and for the initial test i gave the input: “trial”. This was then met with a message stating the key must be in the format “XXXX-XXXX-XXX”. After running it a second time with the key: 1111–1111–1111, the message received was “Check two failed.”, implying that there is a first check which my test key probably passed. This was an interesting result which could help with some of the analysis later on.
Static Analysis
After the initial run i opened the file on Ghidra (a popular free and open source decompiler), and let it analyze the file and generate the disassembly and decompilation. For this crackme just the decompilation was enough to solve it without getting into the disassembly.
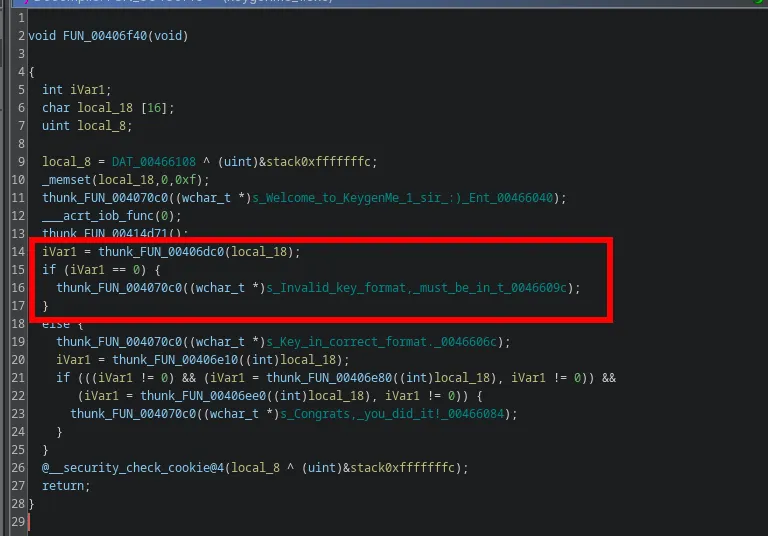
From the initial entry function on the decompilation, I moved onto the next main function as shown on the image below. Most of the function was just standard initialization which is part of the Microsoft C Runtime (CRT) startup code. It is responsible for initializing the CRT environment, setting up the application’s runtime context, and handling the main program execution. The important line to note is:
unaff_ESI = thunk_FUN_00406f40();This line calls the function: FUN_00406f40 and stored the result from the function into unaff_ESI, which is probably the main logic function for the program. unaff_ESI generally refers to the value in the x86 ESI register, which stores the program’s exit code, typically from the main function or an error code like 0xff for initialization failures. The “unaff_” prefix, is used by decompilers like Ghidra or IDA , and indicates that the register’s exact purpose isn’t tied to a named variable in the decompiled code.

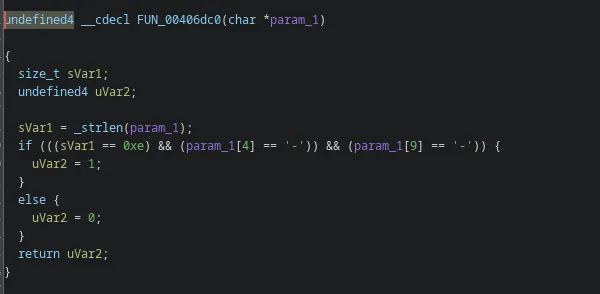
Analyzing the function FUN_00406f40, a lot of familiar strings can be seen from when the program was run including the “invalid key” string and the final “success” message. The marked region of code shows that the result of the function FUN_00406dc0 which decides whether the input is valid or not.
On further inspection of that function, it shows the input validation process, where it checks for the string length being equal to 0xe (hexadecimal for 14), and ‘ - ’ being at positions 4 and 9 in the input.
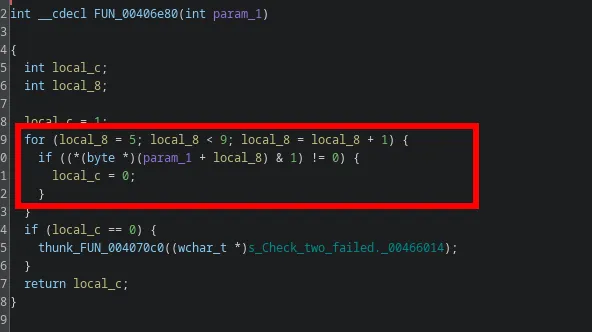
Going back to the original main function, the section with the “success” string shows where the major logic lies in the function to crack it. There is an if statement with 3 checks (which is consistent from the first run-through of the program where it’s known there at least 2 checks). The three functions which do the checks are**: FUN_00406e10, FUN_00406e80, and FUN_00406e**e0. This is because the results of these 3 functions are used to determine whether the success message should be displayed or not.
iVar1 = thunk_FUN_00406e10((int)local_18);
if (((iVar1 != 0) && (iVar1 = thunk_FUN_00406e80((int)local_18), iVar1 != 0)) &&
   (iVar1 = thunk_FUN_00406ee0((int)local_18), iVar1 != 0)) {
  thunk_FUN_004070c0((wchar_t *)s_Congrats,_you_did_it!_00466084);
}
Analyzing each function(check):
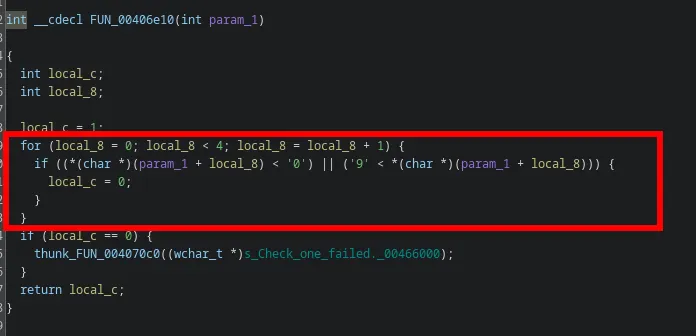
In the first function, it checks if the first 4 characters of the key are between ‘0’ and ‘9’ and not lesser or higher than that in ASCII. Else it returns 0 which then displays the failed message for check one.
The second function, is similar to the first function where it iterates over each character from position 5 to 9, and checks for a certain condition. If it does not pass the condition, the “failed message” is not displayed. The condition for this check is: *(byte *)(param_1 + local_8) & 1 which means that it performs a bitwise AND with “1” to check if the least significant bit (LSB) of the byte is 1. So any character that returns a ‘0’ would ensure that the second check also succeeds. Any even digit always ends with a ‘0’ in binary and hence, 0, 2, 4, … would all pass this check.
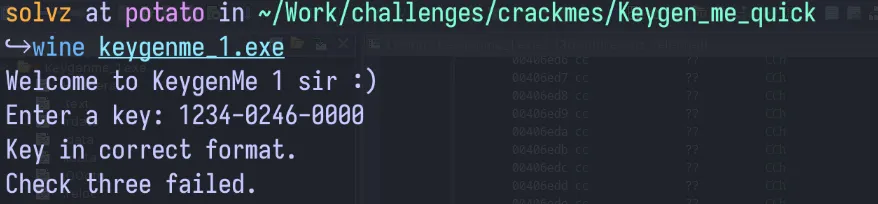
To verify what was analyzed so far, i ran the binary again with a key that passes checks 1 and 2. The reply verified that the key passed the second check too, and only one check remained.
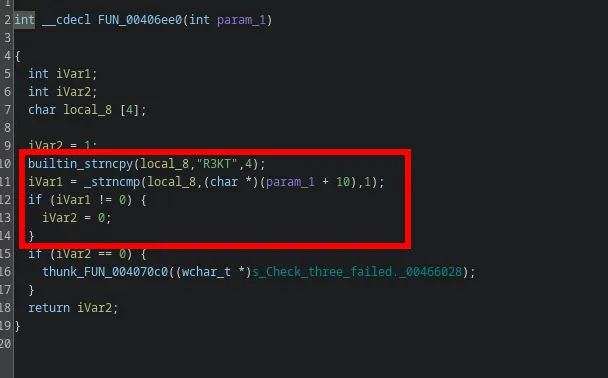
The third check uses the strncpy and strncmp functions. The first function copies a string of length 4 “R3KT” to a local variable. Then strncmp compares the same local variable to the param_1(the key) and returns a non-zero value if the comparison does not pass. So the final part of the key requires the string “R3KT” to pass the validation.
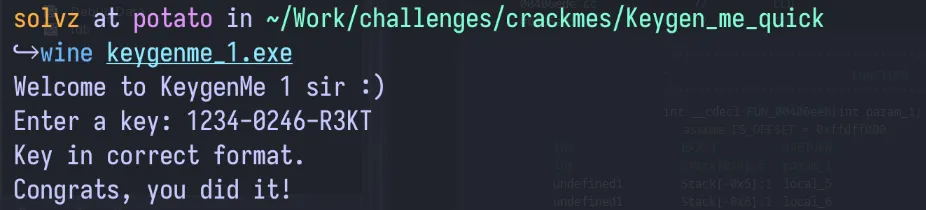
Taking all of this information, the final key can be formed. The first 4 characters can be any digit, followed by 4 characters of even digits and the final part containing the string “R3KT”. Testing this with the key “1234–0246-R3KT”, shows the success message, and hence this was successfully cracked.
Making the Keygen
There is an added challenge to this crackme which was to create a functional keygen. Since it was a simple challenge with the validation not being complicated, the keygen was easy to make. It just required a random 4 digit number followed by a “-”, then a random 4 digit number where each character was an even number followed by a “-”, then the string “R3KT”. The code for a simple keygen is shown below:
import random
part1 = "".join(str(random.randint(0, 9)) for _ in range(4))
part2 = "".join(str(random.randrange(0, 10, 2)) for _ in range(4))
part3 = "R3KT"
print(f"{part1}-{part2}-{part3}")
Final Thoughts
This challenge serves as a good introduction for anyone interested in exploring crackmes and reverse engineering.